This is an Admin or Account owner task. Workspaces are only available for certain subscriptions; please contact us to discuss your subscription.
Workspaces let you organize forms in a way that reflects how your organization works.
In Forms, users can use the Change workspace drop-down to move between workspaces and browse the forms within them. For example, users from different departments may go to the Building Applications workspace or the Parks & Recreation workspace.
Account owners have full access to all workspaces, but Admins can restrict permissions in workspaces they can access, so that only the staff that have permissions can access the forms within them. To continue the example above, users from the Building and Planning department would be unable to access the Parks & Recreation workspace and vice versa.
Create and Edit Workspaces
To create or edit a workspace:
- Go to Admin > Workspaces from the main menu.
- Select Create workspace to create a new one or use the ... menu to Edit an existing workspace. Admins can only edit workspaces that they have permission to access.
- In the Workspace details, enter the Name of your workspace.
- In Permissions, switch between the Administrators tab that allows you to choose which Admins can edit the workspace settings, and the Authors & Reporters tab where you can choose which users can access the workspace forms.
- Select Create to finish creating your workspace or Save if you're editing an existing one.
If your subscription also supports form versioning, you can choose to enable the Form publishing review process. With the All forms must be reviewed before they are published setting checked, then any forms within the workspace must be approved by an Admin before it is published. You can use the Select one or more form reviewers to specify which Admins can review and publish forms, but they must have access to this workspace.
Assign Administrators
Workspace administrators can assign users and forms to the workspace, make changes to the workspace settings, and have full author and reporter access to that workspace.
By default, all users with the Admin role can access and edit a workspace, but you can restrict access to specific users or an Azure AD user group. To restrict access:
- Select the Specific admins radio button in the Administrators tab.
- Use the predictive search bar to search for a specific user with the Admin role or an Azure AD user group containing Admin users.
- Select the user or group from the list and Save.
- To remove a user or group, select Remove from the ... menu next to the user.
All Account owners can access all workspaces, and if no specific Admins are assigned, then all Admins can access it as well.
Manage Authors and Reporters
Assigned Authors can build forms within the workspace, while Reporters access response data within it.
By default, all Authors and Reporters can access a workspace as their role, but you can restrict access to specific users or an Azure AD group. To restrict access:
- Select the Specific author and reporters radio button in the Authors & Reporters tab.
- Use the predictive search bar to search for a specific user or an Azure AD user group. This list will populate with users that have the Author, Reporter, or Admin roles.
- Select the user or group from the list and that user will have access with their role permissions. For example, an Author will have Author permissions in the workspace, but not Reporter permissions.
- If a user has both Author and Reporter permissions, you can further restrict them to only one role within the workspace by checking or unchecking the role box next to their name. This box will be greyed out if they do not have either role assigned to their user account.
- Always Save your changes.
- To remove a user or group, select Remove from the ... menu next to the user.
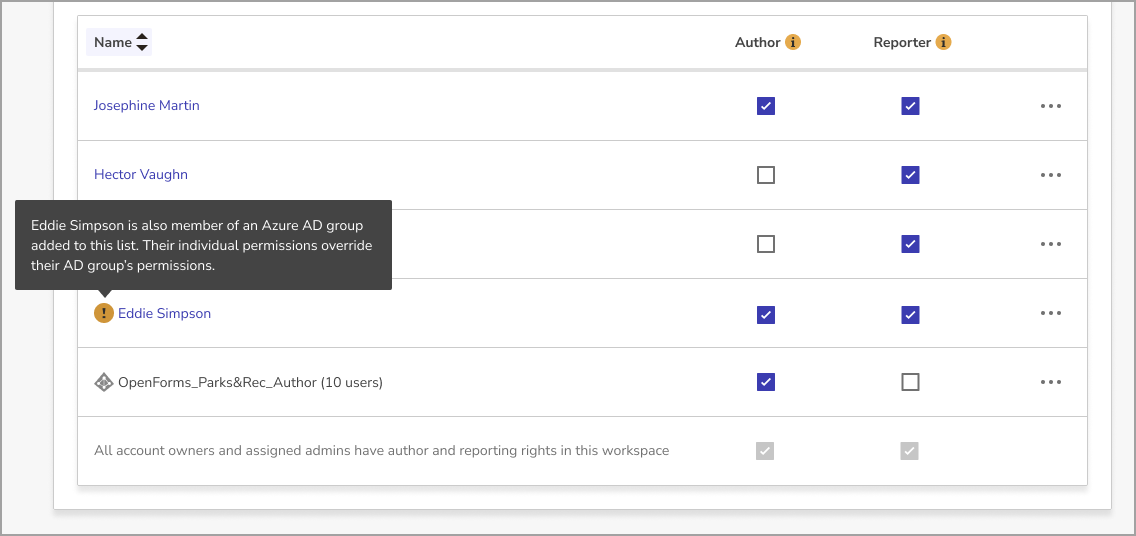
You can add Azure AD groups or specific users as Admins, Authors, and Reporters, but individual user permissions take precedence over Azure AD groups. This allows you to add specific users within the group and change their permissions, so that they differ from the group's permissions. For example, if you add a group with Author permissions, and then add a user from that group and give them Reporter permissions as well, that use will have both Author and Reporter roles, while the others in the group will only have the Author role.
Add Forms to a Workspace
With your workspace created and permissions assigned, you can start adding forms to the workspace. Each form can only live in one workspace, and you can add them as you:
- Create: When you create a form, you can select a workspace from the Which workspace does it belong to drop-down menu.
- Copy: As you copy a form, you can select a workspace from Which workspace does it belong to drop-down menu.
- Move: In the Forms list, select Move from ... menu, choose a workspace from the drop-down menu, and select Move. If you move a form into a workspace with a Form publishing review process in place, any scheduled publish dates will be cleared and the Author must submit the form for review.
Once you've added a form to your workspace, you can also use form permissions to make granular choices about which workspace users can access the form and its responses.
Delete a Workspace
You can only delete a workspace if there are no forms within it. When you have moved all forms out of the workspace, you can:
- Go to Admin > Workspaces from the main menu.
- Select Delete from the ... menu in the workspace list. This option will be unavailable if there are forms in the workspace.
- In the Delete workspace? pop-up, check the Yes, I want to delete this workspace box and select Delete workspace.