Here’s the full list of fields you can add when you create a form.
Basic Fields
Basic fields let respondents enter alphanumeric data and choose from simple options. Most forms comprise largely of these everyday fields.
|
Text
Use a text field when you need someone to type a text-based response. Write a question in the Name this text field area, then Add default text to show in the field when someone opens the form.
If you want to collect phone numbers, use this field instead of a Number field so people can add spaces, hyphens, and brackets.
|
|
Number
Use a number field for a numerical response. Write a question in the Name this number field area, then Add default value to show in the field when someone opens the form.
|
|
Dropdown
Use a drop-down field to get someone to choose a response from a drop-down list. Write a question in the Name this dropdown field area, then select Add dropdown option as many times as you want. Create your options and choose Default option to make an option automatically selected when someone opens the form.
|
|
Checkbox
Use a checkbox field to get someone to choose multiple options from a list. Write a question in the Name this checkbox field area, then select Add checkbox item as many times as you want. Create your items and check Default to make an item automatically selected when someone opens the form and Mandatory to require respondent to select that item.
Looking to add a "none of the above" option to your checkbox field? Use smart logic instead to show respondents only questions that are relevant to them.
|
|
Radio button
Use a radio button field to get someone to choose a single option from a list. Write a question in the Name this radio button field area, then select Add radio option as many times as you want. Create your options and choose Default option to make an option automatically selected when someone opens the form.
|
|
Date
Use a date field for a date-based response. Write a question in the Name this date field area, then select the calendar icon if you wish to default this field to a specific date when someone opens the form.
You can also further restrict the calendar picker to a date (e.g., today) or date range under the field's Settings.
|
|
Email
Use an email field to collect and validate users’ email addresses, or to help you contact them after they submit the form. Write a question in the Name this email field area, then enter some default text or a dummy email to show in the field when someone opens the form.
|
|
Rank
Use a rank field to get someone to rank several options. Write a question in the Name this rank field area. Select Add rank option as many times as you want, then write out your options.
|
Advanced Fields
Advanced fields give respondents more complex options in the form of matrices, integrations, and uploads. Authors can also build forms quickly using the predefined field sets in this toolbox. Advanced fields are unavailable on some legacy subscriptions. Please contact us to discuss your subscription.
|
File upload
Use a file upload field to ask people to upload a file. Give it a name or write a question in the Name this file upload field area.
You can change the maximum number, size, and type of files that users can upload. Learn more at file uploads: settings, restrictions, and virus scans
Anything uploaded to this field uses storage. You can track your storage limit and contact us if you need more storage.
|
|
Calculation
Use a calculation field to calculate a value based on previous responses. This is most helpful when you’re taking payments through your form. With a calculation field, you can use other responses to determine the amount you charge.
See Use calculations for more information.
|
|
Signature
Use a signature field to collect someone’s signature. They can sign using their mouse, or upload a file that includes their signature. To set it up, write a prompt in the Name this signature field area.
Any signature that gets uploaded uses storage. You can track your storage limit and contact us if you need more storage.
Unfortunately, we don't currently have a way to verify signatures that are submitted through this field. Also, while all communications between the database and application are secure, there's no extra encryption for the signature field.
If your form needs a signature, we recommend you seek your own legal advice to find out if the signature field is right for you.
|
|
Location
Use a location field to get someone to enter an address or location. Write a question or prompt in the Name this location field area, and choose which Map provider you want to use. You can use Google Maps or Esri ArcGIS to display maps, but you must have configured a connection first. If you choose Display map, enter coordinates to set the center of the map, and set a zoom level. A higher number means the map will be more zoomed in.
Visit Collect location data for more on location fields.
 High numbers of queries to the Google Maps API can incur a cost. To see when the location field queries Google Maps, go to Get a Google Maps API key.
|
|
Payment
A payment field allows someone to make a payment. Write a question or prompt in the Name this payment field area, and enter the amount you want to charge. You can also use a calculation to determine how much you should charge.
Visit Take payments through your form for more on payment fields.
|
|
Radio matrix
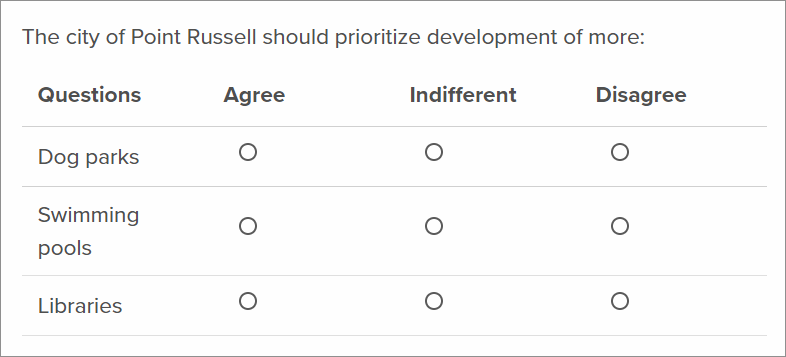
Use a radio matrix to let respondents answer a series of prompts with predetermined answers, such as "agree, indifferent, or disagree." Ask your respondents a question in the Name this radio matrix field, provide a list of prompts with the Questions field, and a list of answers with Responses. Respondents can only give one answer per prompt.

Matrices work best when most of the detail is in the original question and each prompt is short and snappy, as in the example above. If your prompts are quite detailed, they're probably best served with their own radio button field.
|
|
Check matrix
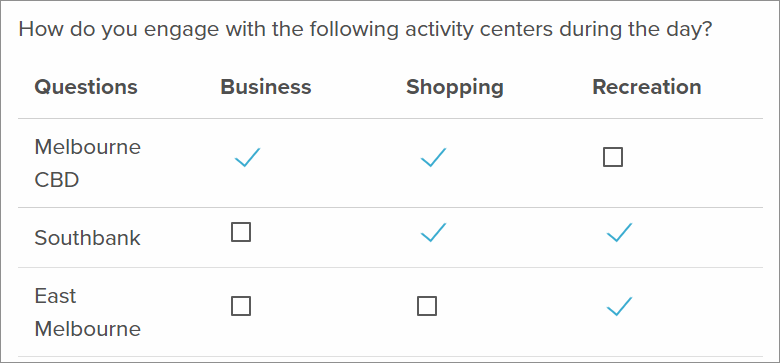
Use a check matrix to let respondents answer a series of prompts with predetermined answers. Ask your respondents a question in the Name this check matrix field, provide a list of prompts with the Questions field, and a list of answers with Responses. Respondents can give multiple answers per prompt.

Matrices work best when most of the detail is in the original question and each prompt is short and snappy, as in the example above. If your prompts are quite detailed, they're probably best served with their own check box field.
|
|
Field set
A field set is a ready-made set of fields that you often use together. It saves time for form authors and improves consistency across your forms.
Visit Group frequently-used fields into field sets for more information.
|
|
Subscriber capture (only available on new subscriptions and is contingent on having a govDelivery account)
Use the Subscriber capture field to connect with and collect subscriber information for a govDelivery account. Form authors can choose between account connections and which topics to present to respondents.
Respondents are able to select Yes or No in the Subscriber capture field, and select which topics to subscribe to when selecting Yes. They must also check the box to consent to your privacy policy, and provide an email address. If you have an Email field in your form, the address entered there will be piped into the Subscriber capture field.
|
Layout Fields
|
Use layout fields to organize the fields in your form into sections and groups and add information with content, images, and videos.
Content fields do not show when viewing responses. This helps keep responses clean and easy to read.
|
| Section
Add a section to make a new area of your form to add fields to. You can choose whether sections appear all on the same page or on separate pages by going to Settings > Display settings > Choose form layout.
|
|
Group
Add a group to your form to add fields to. These can exist within sections to make it easy to fine tune the resident experience of a form and how questions are presented to them.
There are two types of groups - standard groups and repeatable groups. You'll be prompted to choose a type when you add a group to your form.
Both types of groups can be used to collect fields together, move them around your form, and apply settings to multiple fields at once. Repeatable groups make it easy to collect repetitive data by generating repetitions of the group as needed.
For more information see Collect fields together and gather repetitive data with groups.
|
|
Office use only group (available for subscriptions with workflows included)
Add an office use only group to your form. Add fields to this group to let reviewers insert office use only data into responses after they're submitted as part of a workflow.
There are two types of office use only groups - standard groups and repeatable groups. You'll be prompted to choose a type when you add a group to your form.
For more information on the difference between standard and repeatable groups, see collect fields together and gather repetitive data with groups.
|
| Content
Use the content field to insert and style text. The content field's text editor lets you add and style heading and paragraph text, bullet and numbered lists, links, piped answers, and snippets.
|
|
Image
Add an image to your form. You can Upload it from your computer or add an image By URL, and add an Image label.
When uploading images, there are no restrictions on file type or size, but any image you upload uses storage. You can track your storage limit and contact us if you need more storage.
|
|
Video
Add a video to your form. Paste a video embed code from YouTube or Vimeo and add a Video label.
|
Add Fields to Your Form
To add fields to your form, drag and drop them into a section.
After you add a field, you can hover over it and select the cogwheel icon for more editing options - the options will vary depending on the type of field.
For more information about field settings: