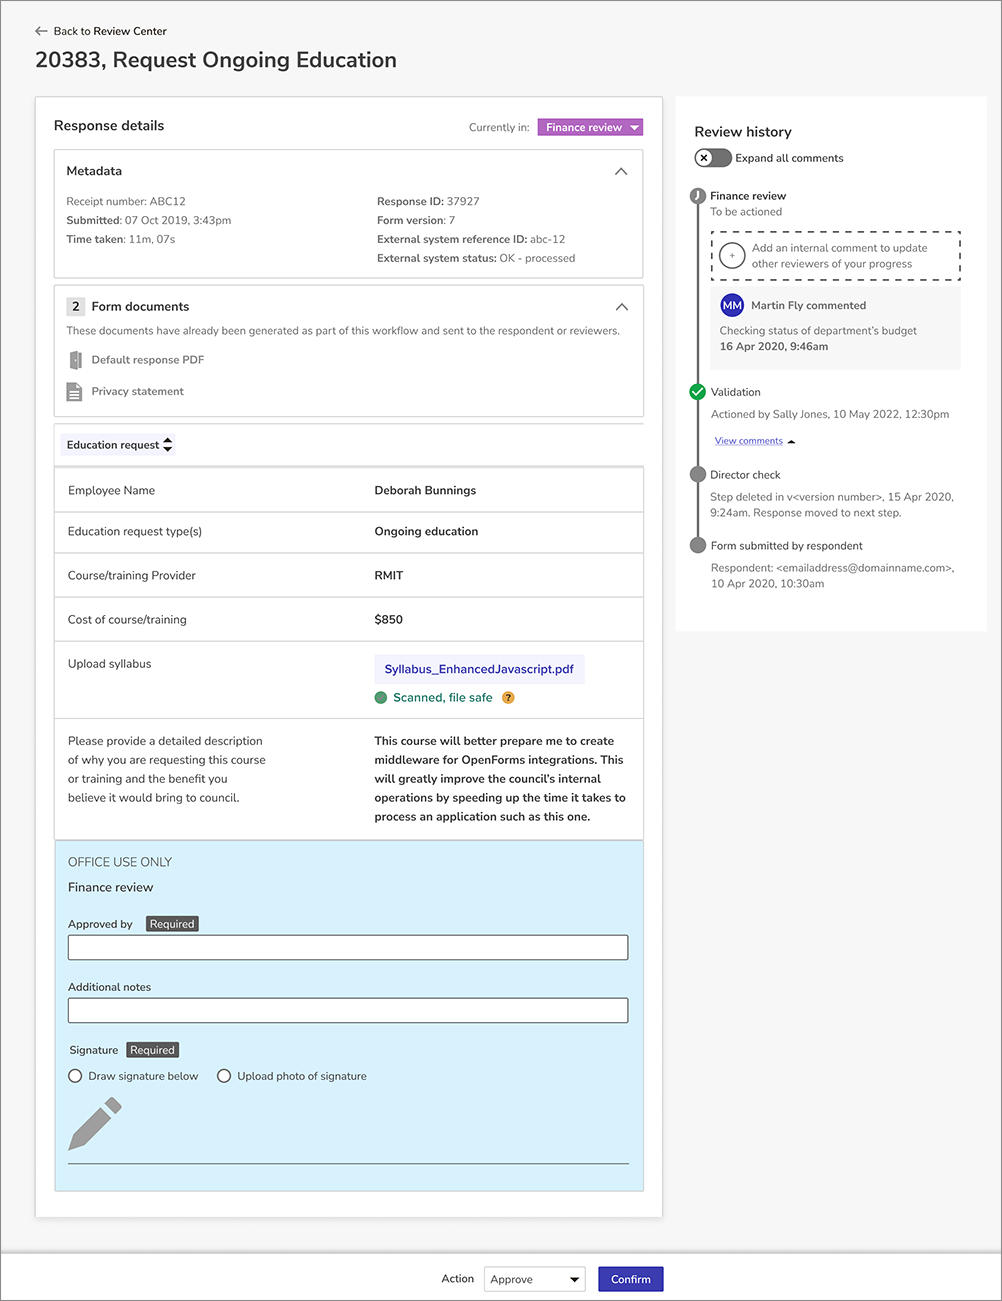
Selecting a response in the Review center will open the Response details. This is where you can view all Response details, the review history, and action responses.
There will be a banner below the menu if another reviewer is looking at the same response. Only one person can action a review, so select the Other reviewers link to see and contact other users who are processing the response. You may want to add an internal comment in the review history when you start processing a response, so other reviewers know you’re working on it.
Response Details
There are several components to the Response details:
| Workflows information |
The workflow information tells you which workflow step this response is currently in. Select the workflow step > View workflow diagram for a visual representation of the workflow for this form and response. |
| Metadata |
The metadata is information about the response, including:
- The Receipt number
- The date and time the response was Submitted
- The Time taken to complete and submit the response
- The Response ID
- The Form version
- The time and date for the response Deletion date
|
| Form documents |
Any documents generated by the response are listed in this section. They can include the default response PDF or custom documents, and you can select the document to download it. |
| Field answers |
This section lists the respondent's answers to each field in the form. Please note:
- All answers are from the respondent unless marked as Office Use Only.
- All file uploads are scanned and marked safe if they are safe to download. Select the file name to view and download it.
|
| Office-use-only fields |
Office Use Only Groups and fields are listed for reviewers to view or complete. Grey Office Use Only sections have been completed in a previous workflow step and cannot be changed in the current step. Blue Office Use Only sections are for the current step. Reviewers must complete any fields marked Required.
If a workflow allows you to send responses back to a previous step, then completed Office Use Only sections can be adjusted. If a reviewer in the previous step changes the answers, the original data is permanently overwritten, so you may want to make an internal comment for any changes.
|
View Review History and Add Comments
The Review history is found to the right of the response details and shows a timeline of the response progression, starting with the latest step. The timeline will detail when the response passed each step and who approved it, and it is also where you can see and add internal comments.
To add internal comments:
- Select Add an internal comment to update other reviewers on your progress.
- Use the text editor in the Add internal comment dialog box to write your comment. Use the Pipe answer drop-down menu to quote respondent answers.
- Select Add.
Internal comments are visible to other assigned Reviewers and to Reporters for the form. Comments from previous steps are initially hidden; select View comments in the timeline or enable Expand all comments to view the complete history.
Response Resubmissions
Some forms allow reviewers to request that the respondent edits and resubmits their answers. The following applies in this scenario
- By default, the Response details will show the answers in the latest submission. Any changes from a previous submission will be highlighted.
- If a respondent re-uploads a file, it will be highlighted as a change, even if the file name is the same as the previous submission. Files from original responses are not retained by OpenForms.
- No new payments are processed if a response is resubmitted and the payment was successful on the original response. If the payment amount calculated on a resubmission is different, the latest response will record the new payment amount, but no new payment is processed. Additional payments or refunds must be processed by your organization outside of OpenForms.
- If a response was sent back to the respondent and then resubmitted, this will be listed in the Review history. Select these events to see the answers for the previous submission in the Response details; response metadata, form documents, and uploaded files will no longer be available for the previous response.
Action Responses in the Review Center
Once you have reviewed a response, you can action it to move it to the next workflow step, or request resubmission if it is enabled for the form.
There will be a banner below the menu if another reviewer is looking at the same response. Only one person can action a review, so select the Other reviewers link to see and contact other users who are processing the response. You may want to add an internal comment in the review history when you start processing a response, so other reviewers know you’re working on it.
Workflow Actions
- Complete any office use only fields that are required or add any necessary internal comments.
- Use the Action drop-down menu to select the Transition that leads to the next correct workflow step. In the example below, the Reviewer can either Approve or Decline the response.
- Select Continue.
- Select Confirm in the Confirm your review dialog box.
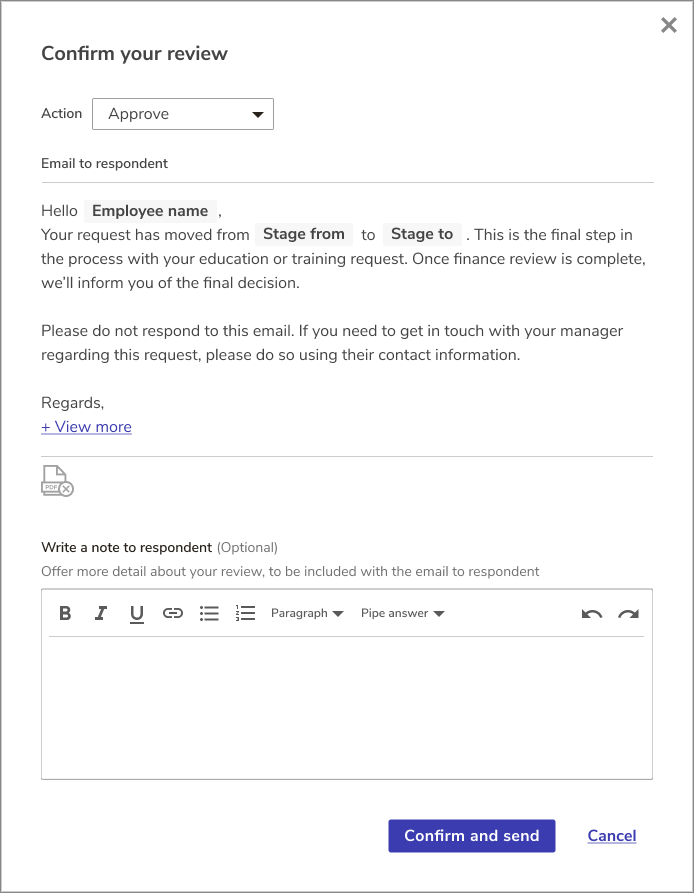
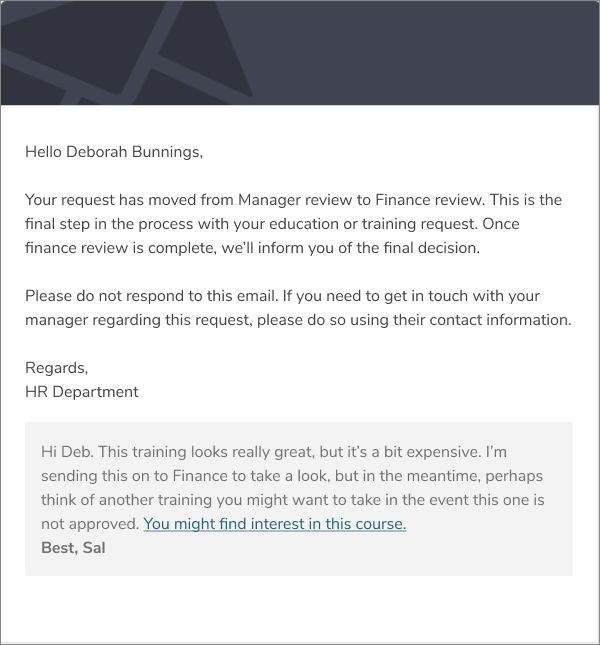
- If the workflow transition triggers any notifications to the respondent, you can also use the Write a note to respondent text editor to add an external comment. The comment will be included below the notification email once you select Confirm and send.
If a response is actioned and moved to a final step, it cannot go back to the previous step. If another reviewer had actioned the response while you’ve had it open, or the response has been deleted, you won’t be able to complete any actions.
Request Resubmission
When a form author creates a workflow, they can use the Resubmission settings to enable reviewers to send responses back to the respondent so they can edit and resubmit their answers. This is useful if the reviewer notices any missing or incorrect information.
To use this option, the form must have an Email field with the Use this address when emailing users about submissions setting checked.
Reviewers can:
- Select Request resubmission in the Response details to open the dialog box.
- Use the Form version drop-down menu to choose if the respondent should resubmit the original Submitted version of the form or the Latest version. The Latest version will include any published edits to the form made since they submitted or since you sent this request.
- Use the Respondent email drop-down menu to select which email to use, if the form contains multiple email fields with the Use this address when emailing users about submissions setting checked.
- Use the Write a note to respondent text box to include any details about what the respondent must change before resubmitting. This is also a good place to let them know that any payments will not be resubmitted.
- Select Confirm and send.
The response will move to the Awaiting resubmission tab, and the respondent will receive an email notifying them of the request. The form author should also have included a link to the form with previous answers pre-filled.
Once they resubmit, the response will go back to the start of the workflow.
Recall a Response
Reviewers can recall a resubmission request if they decide they no longer need the response to be updated:
- Go to the Awaiting resubmission tab in the Review center and select the relevant response.
- Select Recall response to open the dialog box.
- Use the Write a note to respondent text box to tell the respondent why you are recalling the response.
- Select Confirm and send.
The response will return to the workflow step it was in when the resubmission was requested so you can action it. The resubmission request and recall will both be listed in the Review history with the notes sent to the respondent listed as comments.
Responses to archived or deactivated forms can still be recalled so you can complete the review process.