Only available for certain subscriptions; please contact us to discuss your subscription features.
Manage what happens to form responses once they're submitted by creating a workflow.
The Workflow Canvas
- Create a form or open an existing form.
- Go to the Workflow tab.
- Select Create response workflow.
-
This opens the workflow
canvas.
The workflow canvas is a visual representation of your workflow.
As you build your workflow, it will be populated with additional elements like steps and transitions.
To get the best view of your work, zoom in and out with the + and - buttons. Drag your workflow around by holding and moving the cursor.
Elements of a Workflow
Every workflow begins with the "With respondent" step, which represents a respondent completing and submitting your form.
To complete a workflow, you'll need to add
Standard Steps
Standard steps are the review points of your workflow.
These are where reviewers can action a response by approving or denying its progress.
When you add transitions, you'll define what actions are available to reviewers.
Add a Standard Step
- Select the Step button above the canvas.
- In the Add step window, Name the step, assign it a Color, and a Description.
- Select the Standard as the Step type.
-
Add
reviewers to the step by typing their name in the field marked
Select one or more reviewers. If you use Azure AD and have user groups with the
Workflow reviewer role, this field will show up to six
Users and
Azure AD Groups that you can select.
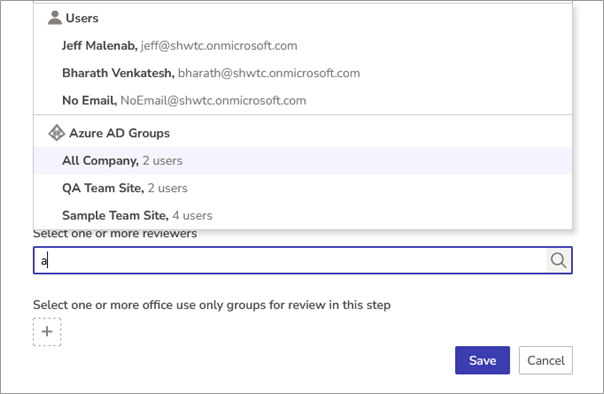
When the reviewer you'd like to add appears, select them to add them as a reviewer for that step. Only users and groups with the
reviewer role can be added as reviewers.
-
If you need to remove a reviewer, hover the cursor over their name and select the
bin icon. A standard step must have at least one reviewer. If you remove the reviewer role or deactivate an assigned user or group, they will be highlighted in red. If there are no more reviewers to the step, a notification is sent to the user who last updated the form that they must review their workflow steps.
-
Select one or more office use only groups for review in this step to add any
office use only groups. If an office use only group is already assigned to another step, it cannot be added to the current step. We'll let you know which step it's assigned to.
-
-
When you're done, Save your step.
Now that you've added your first standard step, you can move the step by clicking and dragging it around the canvas and resize it by clicking and dragging the edges of the step.
Keep adding standard steps until you've covered all the review points in your workflow.
Edit or Delete a Standard Step
Edit a standard step at any time by selecting it and choosing Edit from the menu in the bottom right of the workflow canvas, or double clicking the step.
Delete a step at any time by selecting it and choosing Delete step from the menu on the bottom right of the workflow canvas. Be careful as this will also delete any transitions connected to the step; you will need to confirm the deletion first.
Final Steps
Final steps conclude your workflow. Once a response enters a final step, it can no longer move onto other steps, and cannot be actioned further.
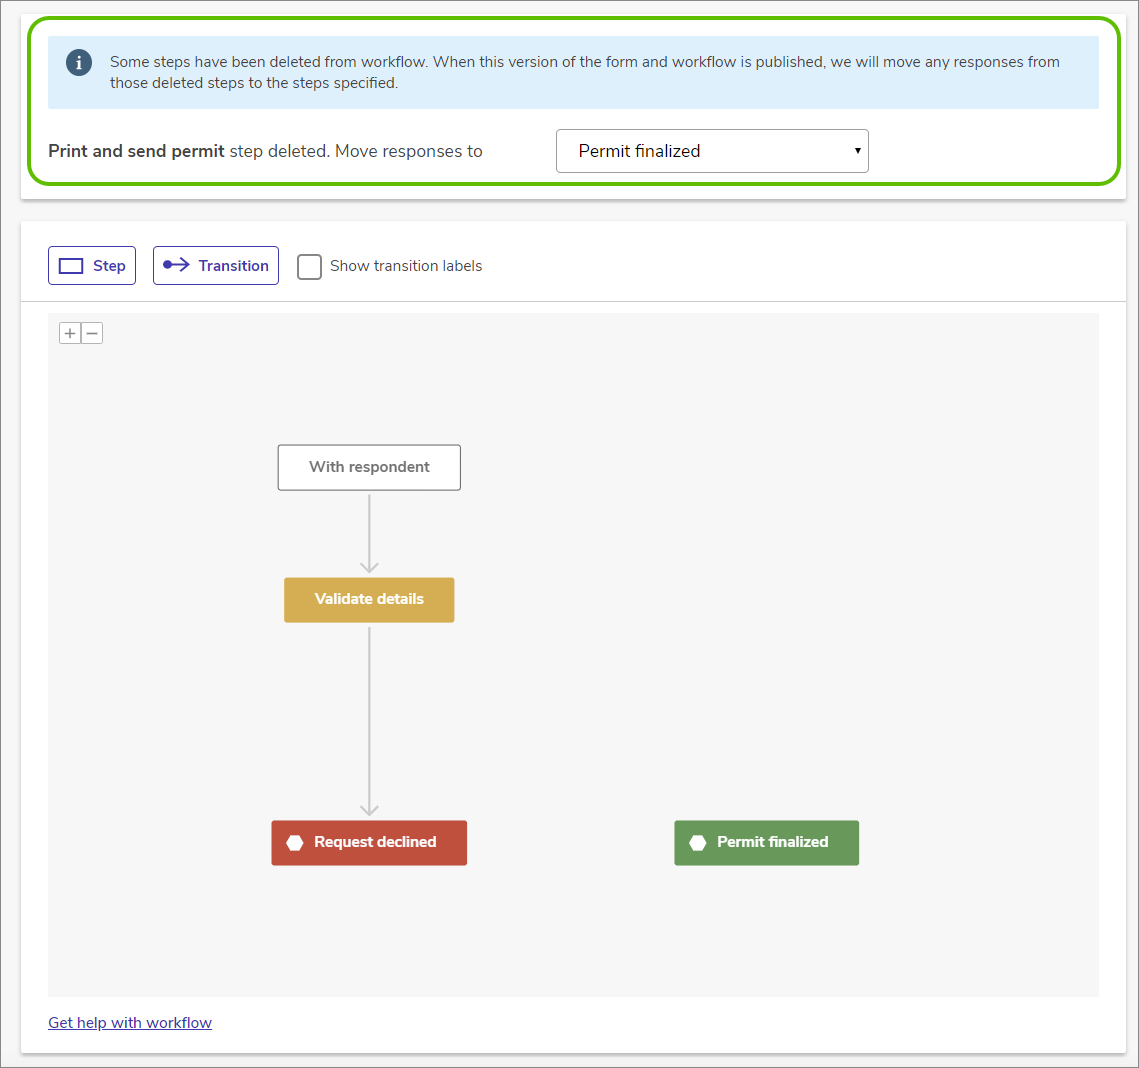
Workflows can have multiple final steps to reflect various outcomes of a response submission. In the example below, the two final steps of a workflow for a parking permit application are "Request declined" and "Permit finalized."
Add a Final Step
- Select the Step button above the canvas.
- In the Add step window, Name the step, assign it a Color, and add a Description.
- Select the Final as the Step type.
-
As with standard steps, you can move and resize final steps on the canvas.
Keep adding final steps until you've added all the possible outcomes of your workflow.
Edit or Delete a Final Step
Edit a final step at any time by selecting it and choosing Edit from the popup menu in the bottom right of the workflow canvas, or double clicking the step.
Delete a final step at any time by selecting it and choosing Delete step from the menu on the bottom right of the workflow canvas. Be careful as this will also delete any transitions connected to the step; you will be asked to confirm the deletion first.
Transitions
Transitions are how form responses move between steps.
Transitions come in two forms, Basic, described here, and Advanced with SmartLogic, which use Smart Logic to automate response progress through a workflow.
If a workflow step contains office use only groups, you may want to use advanced transitions to automate it's progress through a workflow based the reviewer's office use only answers.
If your form contains workflow and is configured to automatically push response data to SharePoint, data will be pushed when a response is transitioned in a final step.
Responses can only move through transitions one way. The direction of movement is indicated by the arrowhead at the end of each transition.
The actions available to reviewers of standard steps are defined by that stage's outgoing transitions.
In the example below, the standard step "Validate details" has two outgoing transitions, "Approved" and "Declined." These are the actions available to reviewers assigned to that step.
By default, the names of transitions are shown when you hover the cursor over them, or over any connected step. To show transition names all the time, select the Show transition labels checkbox above the workflow canvas.
Add a Transition
- Make sure you have at least two steps in your workflow that are not already linked by a transition.
- Select the Transition button above the workflow canvas to add a new transition.
Alternatively, hover your cursor over a step until you see a series of nodes appear around its edge. Hovering over a node will transform your cursor into a cross.
Click and drag the cross to another stage to create a transition.
- Either method will open the Add transition window.
Select which stages your transition links (if you've dragged and dropped a transition, this will already be filled in) and name your transition.
- Use the Notifications tab to send email notifications when a response moves through a transition.
- Save your transition.
You've now added your first transition. Keep adding transitions until your workflow is complete.
As you move steps around, you'll notice your transitions move with them.
Edit a Transition
To edit an existing transition, double-click it, or select the transition then select Edit from popup menu at bottom right of the workflow canvas.
Alternatively, select a transition and drag one of its endpoints to a new step.
Delete a Transition
To delete a transition, select it and choose Delete from the popup menu in the bottom right of the workflow canvas.
With the workflow complete, you can Save and Publish your form.
Edit Published Workflows
If you've previously published a form with a workflow, editing that form and deleting a step from the workflow will prompt you to remap the workflow.
Make sure you specify a replacement step for responses to flow through.
These changes will be listed above the workflow canvas.
Resubmission Settings
Form authors can allow reviewers to request that a respondent edits and resubmits their answers. When resubmission has been requested, reviewers can also recall the request if they decide it is unnecessary.
To use this option, the form must include an Email field with the Use this address when emailing users about submissions setting checked.
To set this up:
- In the Workflow tab of your form, select Resubmission settings.
- Check Allow reviewers to request response resubmissions.
- Select Edit template for the Resubmission request or Recall request to change the content of the email notifications that go to the respondent. Reviewers can add notes before they send the request.
- Select Add a reminder to configure a reminder email that will go to the respondent after a specified period.
- Select Save.
- Save and Publish your form.
What Next?