This article describes the process of setting up Microsoft Azure AD for use with the Forms & Workflow Azure AD connector.
This information is intended for Azure AD administrators, and assumes a working knowledge of Microsoft Azure AD.
If you're an Account owner working with an Azure AD admin to set up the connector, see how the Azure AD connector works for everything you need to know.
Before You Begin
To complete this process you’ll need the assistance of an Account owner, or your own user profile with Account owner role.
If you’re not an Account owner yourself, you should discuss an implementation plan for the Azure AD connector with your organization’s Forms & Workflow team before commencing the connection process.
Retrieve Your Secret Token and Tenant URL
To establish an initial connection:
- Log into Forms & Workflow as an Account owner, or ask an Account owner to log in for you.
- Go to Integrations > Azure AD.
- Select Connect.
- When prompted, copy the Tenant URL and Secret token.
These items are essential to the connection process and will not be displayed again, so make sure you paste them somewhere safe.
Install the OpenForms Enterprise App
Once you've retrieved a tenant URL and secret token from Forms & Workflow:
- Log into Azure AD as an administrator.
- Go to Enterprise applications.
- Select New application.
- Select Search Application and search for OpenForms.
- Select the OpenForms application and Sign up for OpenForms.
- You will be redirected to the Microsoft login page. The user who logs in here must have a Cloud Application Administration role in their Microsoft account.
- After logging in, you will be asked to consent to the permissions needed for Forms & Workflow to connect with Azure AD. Accept these permissions to continue.
Upon completing this process you’ll be taken to the Forms & Workflow login page. To validate that the installation has been completed log into Azure AD and navigate to Enterprise applications. A new application should now be displayed there for Forms & Workflow.
If you need to return to this page in future, log into Azure AD and go to Enterprise applications > OpenForms
Establish a Connection to Forms & Workflow
Once you’ve created a custom application in Azure AD:
- Go to Enterprise applications > OpenForms.
- Select Provisioning.
- Select Get started.
- Select Automatic from the Provisioning mode drop-down.
- Enter your Forms & Workflow Tenant URL and Secret token.
- Select Test your connection.
- If your connection is successful, Save your configuration. This will reveal additional provisioning settings. If your connection is unsuccessful, double check that you've pasted your Tenant URL and Secret token correctly. If you've copied these incompletely, you'll need to restart the connection process in Forms & Workflow to regenerate them.
Provision Data to Forms & Workflow
Once you've successfully connected your custom application to Forms & Workflow, you’ll need to configure its provisioning settings:
- Go to Enterprise Applications > OpenForms > Provisioning.
- Scroll to Mappings.
- Select Provision Azure Active Directory Groups.
- Map the following group attributes:
| Azure AD attribute |
Forms & Workflow attribute |
| displayName |
displayName |
| objectId |
externalId |
| members |
members |
- Save your group mappings.
- Select Provision Azure Active Directory Users.
- Map the following user attributes
| Azure AD attribute |
Forms & Workflow attribute |
| userPrincipalName |
userName |
| switch([IsSoftDeleted], ,"False", "True", "True", "False") |
active |
| mail |
emails(type eq "work"), value |
| givenName |
name.givenName |
| surname |
name.familyName |
| objectId |
externalId |
- Delete all other user attributes.
- Save your user mappings.
- Scroll to Settings.
- Use the Scope drop-down to define what data you'd like to send to Forms & Workflow.
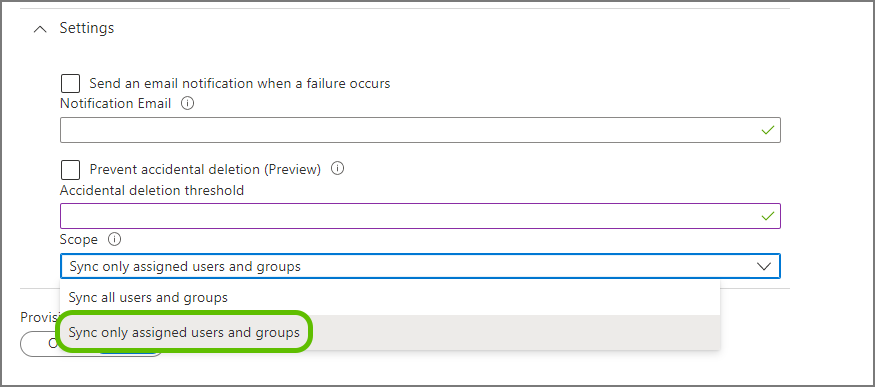 By selecting Sync only assigned users and groups you can ensure you reduce the scope of sent data. We strongly discourage selecting Sync all users and groups and provisioning your entire Azure AD staff directory to Forms & Workflow. Syncing all data can affect your user quota and clutter the Azure AD connector interface. For information on how to define the scope of provisioned data, see What data to provision
- Set Provisioning Status to On.
- Save your settings.
Once you have set provisioning to "On," Azure AD will queue a data sync with Forms & Workflow. Depending on Microsoft server resources, this will usually occur within an hour.
As this is happening, you can let your Account owner know that they can complete the connection wizard in the Forms & Workflow platform.
However, they should not begin assigning roles to Azure AD User groups until the first sync Azure AD sync is complete.
You can check the progress of this sync at Enterprise applications > Your custom OpenForms application > Provisioning.
What Data to Provision
There are two methods of defining the scope of data sent to Forms & Workflow:
Whitelist Specific Groups
This method requires a Premium Azure AD license.
For most organizations, whitelisting specific Azure AD user groups is the simplest way to ensure that only staff that need to use this platform are granted roles through the connector.
To use this method, you'll need an active directory structure containing groups that correspond to particular roles.
To make life easier for the Account owners that will assign these staff roles in the AD connector, it's best to create new groups for these staff with descriptive names reflective of the roles they'll require (for example, "forms_humanresources_reviewer")
Once you've set up those groups:
- Go to Enterprise applications > OpenForms > Provisioning > Settings.
- Select Sync only assigned users and groups from the Scope drop-down.
- Save your settings.
- Go to Enterprise applications > OpenForms > Users and groups.
- Select Add user/group.
- In the Add assignment screen, choose the groups you would like to assign.
As the Forms & Workflow Azure AD connector cannot assign roles to individual users, make sure you assign specific groups, rather than users.
- Return to Enterprise applications > OpenForms > Provisioning and finalize your provisioning setup.
Filter Provisioned Groups by Their Attributes
Instead of whitelisting particular groups, you can filter the groups and users sent to Forms & Workflow by their attributes, such as the presence of "HR" in a group or user attribute. Because this method does not rely on a group naming structure, it can be more difficult for Account owners to understand when assigning roles to Azure AD user groups.
Once you've decided on the attributes you'd like to filter by:
- Go to Enterprise applications > OpenForms > Provisioning > Settings.
- Select Sync all users and groups from the Scope drop-down.
- Save your settings.
- Go to Mappings.
- Select Provision Azure Active Directory Groups.
- Under Source object scope, select All records.
- Select Add scoping filter.
- Set up your filter using the available options.
- Select OK.
- Add as many additional filters as you need.
- Select OK.
- Save your settings.
- Return to Enterprise applications > OpenForms > Provisioning > Mappings.
- Optionally, you can also select Provision Azure Active Directory Users and apply additional filters for user attributes (for example, an "FormsWorkflow" attribute).
- Save your settings.
- Return to Enterprise applications > OpenForms > Provisioning and finalize your provisioning setup.
Pause Provisioning
If at any time you want to pause provisioning data (for example, if you are restructuring your Azure AD staff directory):
- Go to Enterprise applications > OpenForms > Provisioning.
- Select Stop provisioning.
This will temporarily prevent changes in Azure AD from propagating to Forms & Workflow.
Any users that were assigned roles based on their Azure AD user groups will keep those roles and access until provisioning is resumed, even if they are moved or deleted in Azure AD. New staff added to groups in Azure AD will not be assigned roles while provisioning is paused.
Disconnect from Forms & Workflow
To permanently disconnect:
- Disconnect from Azure AD.
- Go to Enterprise applications > your custom OpenForms application > Properties.
- Select Delete.
- Repeat the process above for Enterprise applications > OpenForms.
What Else?