To generate custom documents from response data, you must first prepare a template for Forms & Workflow to pipe that data into. These templates can be in Microsoft Word or Adobe PDF format.
This article describes when to use Adobe PDF templates, and how to prepare them for upload to Forms & Workflow. See our article on formatting Microsoft Word templates for custom documents for information on preparing templates in Word.
From time to time, working with Adobe Acrobat may require layout and formatting troubleshooting that can benefit from a proficiency of Adobe Acrobat or similar design programs. If you have someone internally who is familiar with document templates, we recommend working with them. If you need further assistance, refer to Adobe Acrobat's help guide.
About PDF Templates
PDF templates retain a consistent layout no matter how much data is piped into them. This is because response data is “painted” onto predefined areas.
Response data will never exceed the space assigned to it by default. If a response is too long for the space it’s piped into, it will be resized to fit (as above). Depending on how you’ve set up your PDF template, though, overflow text may be truncated.
This means that PDF templates are best suited to forms that receive predictable amounts of response data, though you can always impose a character limit on a text field to keep responses succinct.
When to Use PDF Templates
If your response data suits them, PDF templates offer extremely flexible layout and design options, meaning that you can generate custom documents using these templates that look exactly how you want them to.
One common use case for PDF templates is generating custom documents that exactly match your paper forms, as above.
By piping response data into custom documents that are identical to your existing paperwork (complete with checkboxes, piped signatures, and so on), you can file responses together regardless of whether they were collected through Forms & Workflow forms, by mail, or in person.
If you intend to use custom documents to file Forms & Workflow responses alongside paper forms, it’s worth noting that custom documents aren’t an archival substitute for raw response data. Documents generated from PDF templates are flattened upon generation, so there’s no code-level indication of what is template content and what is response data.
You should also use these templates whenever you'd like your custom documents to be rigidly structured or carefully styled.
When Not to Use PDF Templates
PDF templates aren’t suited to forms that invite highly variable, potentially lengthy responses, as these can be difficult to read if they’re scaled down too much, or even cut off depending on your template settings.
Preparing PDF templates can take longer than preparing an equivalent Word template, and you'll need a licensed copy of Adobe Acrobat DC. If you're not too concerned about matching an exact layout or complying with strict design guidelines, you may find Word templates quicker and cheaper to make, while still being sufficient to your needs.
Prepare a PDF Template
To format a PDF template for Forms & Workflow, follow these three basic steps:
-
Lay out your template
-
Add form fields in Adobe Acrobat DC
-
Save your template in a supported PDF format
Lay Out Your Template
You can lay out your template in any program you’d like, so long as you or your design team save the file in a format that Adobe Acrobat can work with. Just make sure to include all of the graphical and layout elements you’d like to use in your custom document, and leave space for response data to be piped in.
The PDF template above, for example, was actually created in Microsoft Word, but by formatting it in Adobe Acrobat, it can take advantage of features unique to PDF templates, such as piping in checkbox and radio button selections as visual data rather than text, and maintaining a strict layout.
Make sure the person responsible for adding form fields to the template has access to any custom or paid fonts used in the initial layout, and has the appropriate font licenses to embed these into a PDF.
Add Form Fields in Adobe Acrobat DC
Once your template is laid out, import it into Adobe Acrobat to designate where Forms & Workflow will pipe response data into it.
To do this, you’ll need a licensed copy of Adobe Acrobat DC (Standard or Pro).
Here’s what to do:
-
Open your template file in Adobe Acrobat DC.
-
Go to Tools > Prepare Form.
-
Uncheck This document requires signatures.
-
Leave Form field auto detection on.
-
Select Start.
Adobe Acrobat will attempt to recognize the areas, or "fields," in your template file that data will be piped into. This is typically quite successful, but you'll still need to fine tune your template by configuring the field properties, and adding fields that Acrobat has missed.
You may also have to delete some fields that Acrobat has wrongly added, to do this right-click a field and select Delete.
Adobe Acrobat Fields that Accept Forms & Workflow Data
There are five types of Adobe Acrobat form fields that you can add to your template to receive response data:
Other Adobe Acrobat form fields such as Barcode and Button fields are unsupported. The type of field that is appropriate to your template depends on the kind of data you'd like to pipe in. You might first want to see what data can be piped into custom documents from Forms & Workflow forms.
Text Fields
The majority of field responses are piped into PDF templates as text.
This means that many of the fields you configure in your PDF template are likely to be text fields, even if they are configured as other fields (such as file upload, image, or payment fields) in your form.
To insert a text field:
-
Select Add a Text field from the Prepare Form toolbar.
-
Use the Add a Text field cursor to select an area you’d like to pipe text data into.
-
You’ll be prompted to name your text field - write something descriptive of the form field you’d like to pipe into your text field.
This doesn’t have to be an exact match to your Forms & Workflow field name, but the more descriptive it is, the easier it will be to map your template fields later.
- If your form contains repeatable groups and you'd like to pipe data from those groups into your form (including text), make sure you include template fields for every repetition of those groups.
-
Repeat the process for any additional text fields in your template.
Text Field Properties
Once you’ve added your text fields, you’ll need to configure their properties. To do this:
-
Choose the Select tool from the Prepare Form toolbar.
-
Select the text field you’d like to configure. If you’d like to apply the same settings to multiple form fields, you can select as many as you like by holding Shift as you select them.
-
Double-click one of the text fields you have selected to open the Text Field Properties window.
-
Go to the Appearance tab and set the font properties you’d like to use.
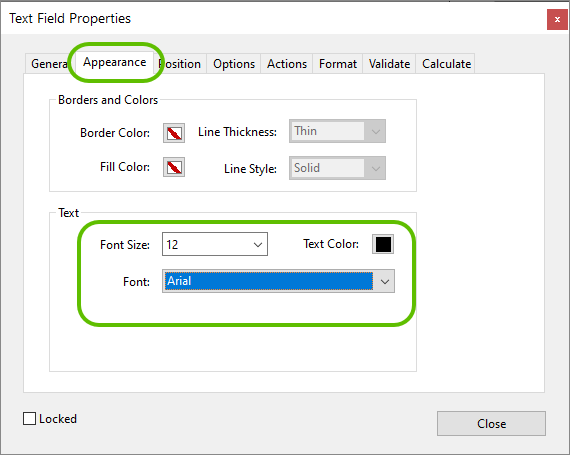
Select a font size for text piped into the field. It's a good idea to select a size consistent with the rest of the text in your form, otherwise Acrobat will scale up any piped text to fit the text field you've created (which can look inconsistent with the rest of your layout). If the response data will not fit at this size, your text will be scaled down to fit unless you select Multi-Line rendering. Border and color options in this tab will not be rendered by Forms & Workflow , so if you’d like to have a border around text fields, you’ll need to add this when laying out your template.
-
Go to the Options tab and uncheck Scroll long text.
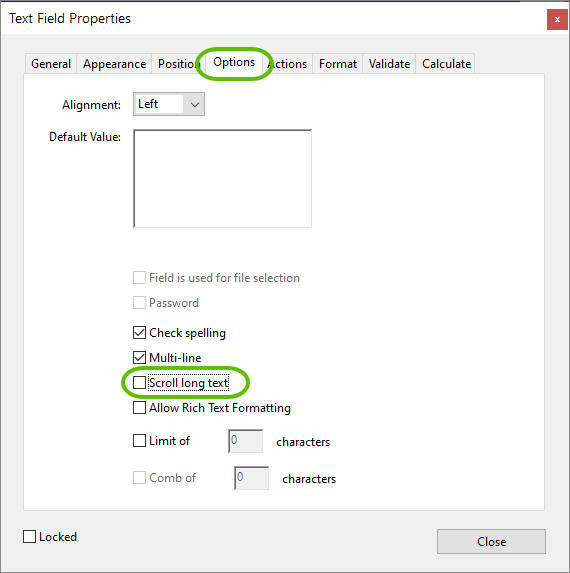
Leaving Scroll long text enabled can cut off piped text when custom documents are generated from your PDF template. This option should always be off.
In the
Alignment drop-down, be sure to check and assign the alignment suitable for your template.
-
If you’d like to pipe in text data as multiple lines (as in the example below), check Multi-line.
Checking Multi-line will pipe form data in across multiple lines, so long as there is room in your text field. If the piped text is too long to fit the space provided, it will be cut off rather than scaled to fit. For this reason, it's important to add a character limit to any text fields in your form that you'd like to pipe into PDF template fields that use this option.
-
Close the Text Field Properties window.
Drop-Down Fields
Adobe Acrobat drop-down fields can be used to pipe Forms & Workflow dropdown selections into PDF templates.
Drop-down selections are piped in as text corresponding to a selection available in the form.
To insert a drop-down field:
-
Select Add a drop-down list from the Prepare Form toolbar.
-
Use the Add a drop-down list cursor to select an area you’d like to pipe a drop-down selection into.
-
You’ll be prompted to name your field - write something descriptive of the field you’d like to pipe in.

This doesn’t have to be an exact match to your form field name, but the more descriptive it is, the easier it will be to map your template fields later.
-
-
Repeat the process for any additional drop-down fields in your template.
Drop-Down Field Properties
Once you’ve added your drop-down list fields, you’ll need to configure their properties.
This step involves matching data in each drop-down’s properties exactly to the answers in their corresponding Forms & Workflow field, so you’ll want to have your form open in another tab or window to cross reference your work.
To configure a drop-down field:
-
Double click on the drop-down list field you’d like to configure. This will open the Dropdown Properties window.
-
Go to the Appearance tab and set the font properties you’d like to use.
The font size you select will be the font size for text piped into your drop-down field. If the response data will not fit at this size, your text will be scaled down to fit. Border and color options in this tab will not be rendered by Forms & Workflow, so if you’d like to have a border around text fields, you’ll need to add this when laying out your template.
-
Go to the Options tab and add each answer from your corresponding Forms & Workflow dropdown field as an Item.
These values must match your dropdown answers exactly, so you may want to copy and paste them directly from your form.
-
Keep adding Items until you've filled the Item List with all of the selections available in your Forms & Workflow dropdown field.
-
Close the Dropdown Properties window.
Checkbox Fields
Adobe Acrobat checkbox fields are used to pipe checkbox selections into PDF templates.

Checkbox selections are piped into PDF templates as visual marks (like ticks, crosses, and so forth) corresponding to a selection available in your Forms & Workflow form.
To insert a checkbox field:
-
Select Add checkboxes from the Prepare Form toolbar.
-
Use the Add checkboxes cursor to select a checkbox you’d like to pipe a checkbox selection mark into.
-
You’ll be prompted to name your field - write something descriptive of the form field you’d like to pipe in and the checkbox answer you’d like to use.

This doesn’t have to be an exact match to your field name, but the more descriptive it is, the easier it will be to map your template fields later.
-
-
Repeat the process for any additional checkboxes in your template.
Checkbox Field Properties
Once you’ve added your checkbox fields, you’ll need to configure their properties.
This step involves matching data in each checkbox’s properties exactly to their corresponding Form & Workflow selection, so you’ll want to have your form open in another tab or window to cross reference your work.
-
Double-click on the checkbox field you’d like to configure. This will open the Check Box Properties window.
-
Go to the Options tab and select the Check Box Style you’d like to use.
Make sure this is consistent with the style for the rest of the possible checkbox selections for the answer you'd like to pipe in. If your PDF Template contains a lot of checkboxes, you may want to select them all at once and apply a Check Box Style to them all before adjusting their individual settings. To do this, select all the checkboxes you'd like to style, double-click one, and select the appropriate style from the Options tab.
-
In the Export Value field, insert the value for your corresponding Forms & Workflow checkbox.
This value must match your checkbox selection exactly, so you may want to copy and paste it directly from your form. Some special characters (e.g., those typed using a non-English keyboard) may be incompatible so avoid using them in the value if possible.
-
Close the Check Box Properties window.
-
Repeat this process for every checkbox in your PDF template.
-
You may want to Align your checkboxes after placing by selecting all your placed checkboxes and using the right-click > Align, Distribute or Center menu.
Radio Button Fields
Adobe Acrobat radio button fields are used to pipe radio button selections into custom documents.
Radio button selections are piped into PDF templates as visual marks (like ticks, crosses, and so forth) corresponding to a selection available in your Forms & Workflow form.
-
Select Add radio buttons from the Prepare Form toolbar.
-
Use the Add radio buttons cursor to select a radio button that you’d like to pipe a radio button selection mark into.
You’ll be prompted to enter a radio button Group Name - write something descriptive of the form field you’d like to pipe in.
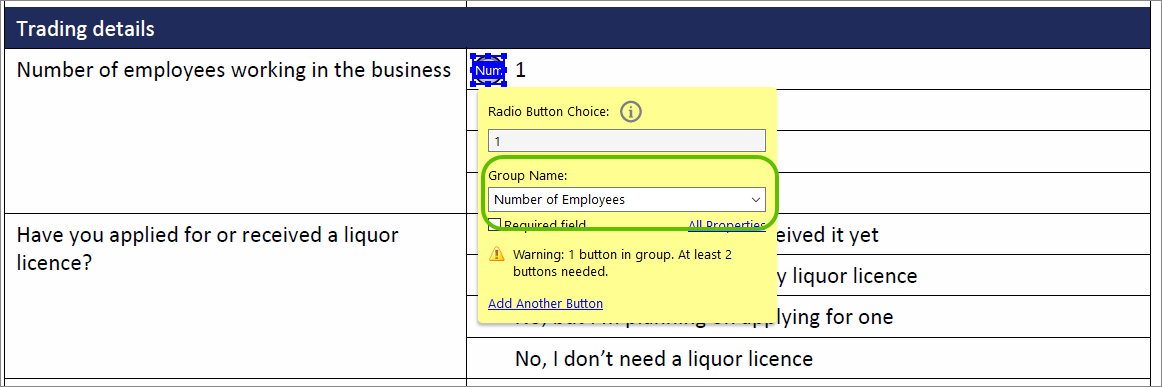
This doesn’t have to be an exact match to your field name, but the more descriptive it is, the easier it will be to map your template fields later.
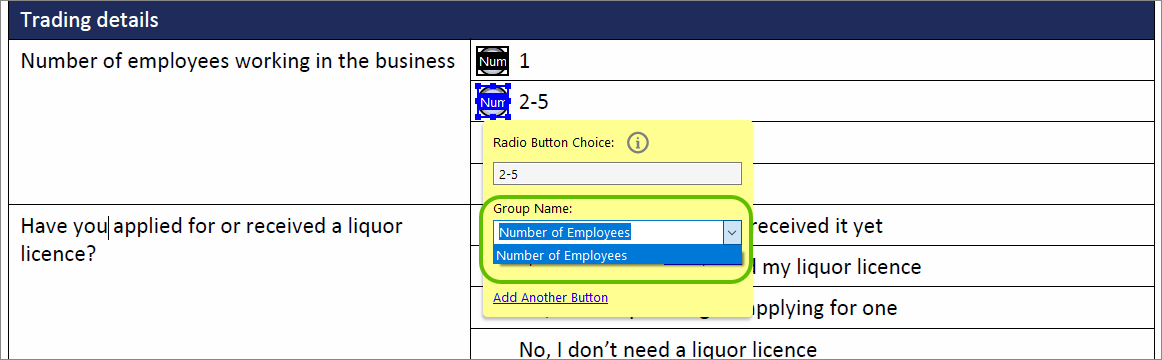
Once you have named your first radio button in a group, you can select that name from a drop-down when placing subsequent radio buttons that correspond to the same Forms & Workflow field.
-
Repeat the process for any additional radio buttons in your template, being sure to give each group of buttons that correspond to a single Forms & Workflow field a common name.
-
If your form contains repeatable groups and you'd like to pipe data from those groups into your form (including radio button selections), make sure you include template fields for every repetition of those groups.
-
You may want to Align your radio buttons after placing by selecting all your placed radio buttons and using the right-click > Align, Distribute or Center menu.
Radio Button Field Properties
Once you’ve added your radio button fields, you’ll need to configure their properties.
This step involves matching data in each radio button’s properties exactly to their corresponding selection, so you’ll want to have your form open in another tab or window to cross reference your work.
-
Double-click on the radio button field you’d like to configure. This will open the Radio Button Properties window.
-
Go to the Options tab and select the Button Style you’d like to use.
Make sure this is consistent with the style for the rest of your radio button group. If your PDF Template contains a lot of radio buttons, you may want to select them all at once and apply a Button Style to them all before adjusting their individual settings. To do this, select all the radio buttons you'd like to style, double-click one, and select the appropriate style from the Options tab.
-
In the Radio Button Choice field, insert the value for your corresponding radio button selection.
This value must match your Forms & Workflow radio button selection exactly, so you may want to copy and paste it directly from your form.
-
Close the Radio Button Properties window.
-
Repeat this process for every radio button in your PDF template.
Image Fields
The only images that can be piped into PDF templates are Forms & Workflow signatures.
Images uploaded by form respondents using the file upload field are piped in as a list of filenames.
To insert a signature image into a PDF template:
-
Select Add an Image Field from the Prepare Form toolbar.
-
Use the Add an Image Field cursor to select an area you’d like to pipe a signature image into.
-
You’ll be prompted to name your field - write something descriptive of the signature field you’d like to pipe in.
This doesn’t have to be an exact match, but it helps to be as specific as possible. Signature images and signatory names can both be piped into PDF templates as images and text, respectively, so it's a good idea to specify which signature information you're piping when naming these fields (image or name).
- If your form contains repeatable groups and you'd like to pipe data from those groups into your form (including signatures), make sure you include template fields for every repetition of those groups.
-
Repeat the process for any additional signature images you’d like to pipe into your template.
There’s no need to configure any image field properties.
Repeatable Groups
If your form contains repeatable groups and you'd like to pipe data from those groups into your template, make sure you include fields for the maximum number of repetitions for those fields, as defined in your groups' field settings.
In the example above - for an expense reimbursement form - a respondent can enter up to four itemized expenses.
To create a PDF template that includes these expenses, insert the appropriate field type (text, drop-down, and so on) for every one of the the maximum number of possible answers (even if some respondents may only enter a single expense). In the generated document, any repetitions respondents does not use will be left blank.
Save Your Template in a Supported Format
Once you’ve inserted and configured all of the fields you’d like to pipe form data into, it’s time to save your PDF template and upload it to your Forms & Workflow form.
Before saving, it's important to check your PDF's file properties to ensure it will work with Forms & Workflow.
Supported PDF Versions
PDF templates exported using the following PDF versions are supported:
1.2, 1.3, 1.4, 1.5, 1.6, or 1.7
If you’re using an up-to-date version of Adobe Acrobat DC as part of a Creative Cloud subscription, your PDF version should be well within the range Forms & Workflow can work with.
To double check, go to File > Properties and check the PDF version in the Description tab.
Custom Fonts
By default, Adobe Acrobat automatically embeds the fonts you've used in your template to ensure the file renders correctly. When you use the Save or Save As command, your fonts are embedded so long as they are available on your computer and you have an appropriate license to embed them. Please note:
- Using Acrobat's other export commands can give you more control over your PDF's embedded fonts, but also prevent Forms & Workflow from piping in response data.
- Some font licenses do not allow embedding into PDF documents. If you’re using paid or custom fonts in your template, we recommend checking how the template renders on a device without those fonts installed after you’ve created it. Font licensing is a complex area. If your organization uses paid or custom fonts, your design team or brand manager should be able to tell you more about how to proceed.
- Embedded fonts can significantly increase the size of PDF templates and the custom documents generated from them. If you generate a lot of custom documents from a template containing multiple embedded fonts, this can impact your
Ready to Save?
If your PDF template uses the correct PDF version and contains all the fonts recipients will need to view it, go ahead and save your PDF template
- Go to the File menu and select Save or Save As.
- If you are prompted to choose a save location, make sure you leave Reduce File Size and Restrict Editing unchecked.
Adobe Acrobat offers a large range of export options. Saving your PDF template using options other than the default "Save" or "Save As" commands may flatten any fillable fields, preventing Forms & Workflow from piping response data in.
What Else?